Troubleshooting
Issues with the Adyen Integration Plugin can be related to the one or more of following:
- VTEX Configuration Issues;
- Adyen configuration errors;
- Checkout Customizations;
- Other VTEX service availability errors;
If you encounter any issues during the integration process, refer to the following most common troubleshooting scenarios:
VTEX Configuration Issues
Payment Method Not Appearing
Ensure that the payment method is correctly configured and activated in the VTEX admin panel. (See: Configuring Payment Methods)
Payment Method Not Available
Check the payment method configuration in the VTEX admin panel and ensure that it is properly configured and enabled. (See: Configuring Payment Methods)
Transactions Failing
Verify the API credentials and ensure that the AdyenV3 Payment Provider is properly configured in VTEX admin at https://{{account}}.myvtex.com/admin/affiliations. (See: Configuring the Provider and API Key Configuration)
Sub-Accounts Configuration
If you are using sub-accounts in VTEX, ensure that the correct sub-account is selected in the VTEX admin panel and that the complete setup of the Provider and Payment Methods is done for the selected sub-account. Each sub-account can have different configurations and they do not inherit the configurations from the main VTEX account.
Other Common VTEX Issues
Before opening a support ticket with VTEX, please test in a default VTEX Checkout with a standard product to ensure that the issue is not related to the store's customizations.
Testing the purchase flow with a standard product
Choose a product for testing the Purchase Flow that does not require any special or specific configuration such as attachments, accessories, subscritions or kits. This will help to identify if the issue is related to the product configuration or the purchase and payment flow.
Purchase with Two Cards Using SallesApp
To complete a purchase with two cards, you must first finalize the purchase with one card (choosing whether or not to print the payment receipt). This means releasing the terminal for the second transaction with the second card.
VTEX Checkout Customizations
- Custom Scripts: Disable any custom scripts or CSS that may be interfering with the payment process using the instructions provided in the next section.
- Third-party Plugins: Check for any third-party plugins or integrations that may be causing conflicts with the payment provider.
- Google Tag Manager: Ensure that Google Tag Manager or other tracking scripts are not blocking the payment process.
How to test the Payment Flow using the default VTEX Checkout
-
Verify which checkout version is being used in the store.
- In VTEX Admin search for checkout in the search bar.
- if you only find Checkout in the search, your store is using checkout-ui-settings

- if you find Checkout and Checkout UI Custom, your store is using checkout-ui-custom

- if you only find Checkout in the search, your store is using checkout-ui-settings
- In VTEX Admin search for checkout in the search bar.
-
Disabling Customizations in Checkout for Testing: 2.a For Stores using checkout-ui-settings:
-
Go to
https://{{account}}.myvtex.com/admin/portal/#/sitesor click on the Checkout option in the search results list
-
In the Checkout screen, click on the blue gear icon
 in the Checkout that is being used by your store to access the Checkout configurations
 -
In the Checkout configurations screen, click on the Code or Código at the top of the page
-
In the following page look for the file checkout6-custom.js file in the right side list

-
Click on the checkout6-custom.js file to open it

-
Copy the content of the file if there is any customization and save it in a safe place
-
Delete all the content of the file and click Save to remove any customization
-
Repeat the same process for the file checkout6-custom.css
-
Test the checkout process in the store
2.b For Stores using checkout-ui-custom:
-
Go to
https://{{account}}.myvtex.com/admin/vtex-checkout-ui-custom/or click on the Checkout UI Custom option in the search results list
-
In the Checkout UI Custom screen, click on the Javascript tab
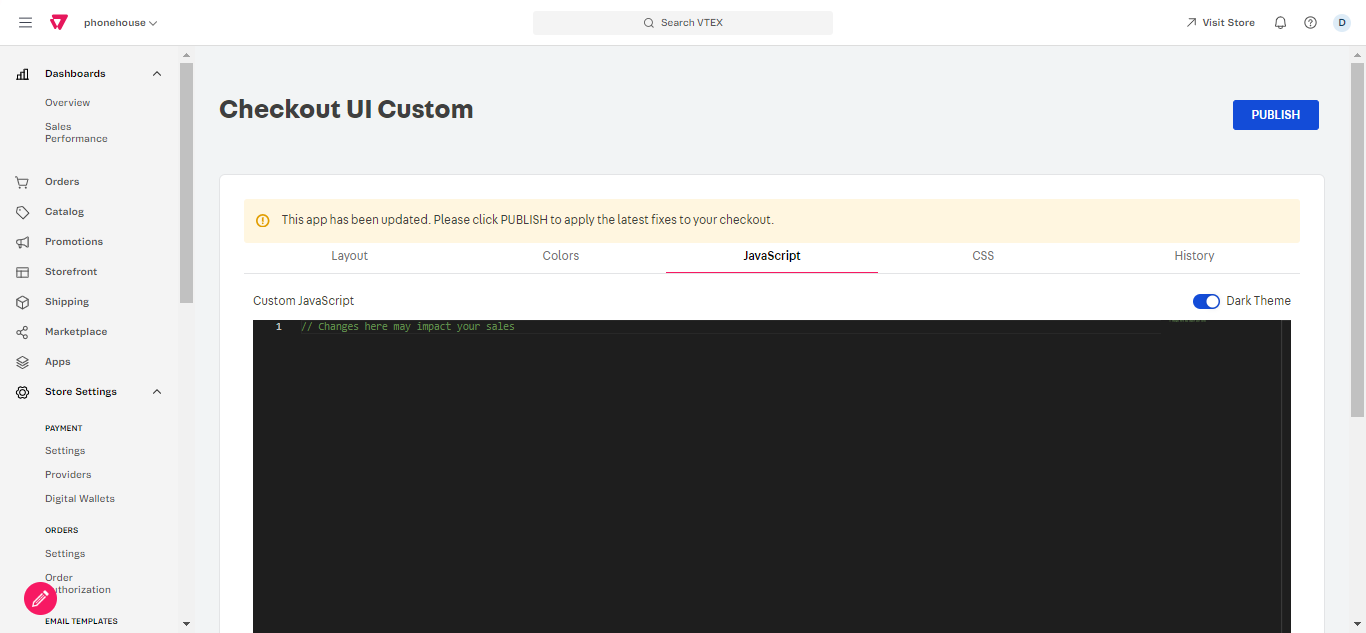
-
In the Javascript tab, go to the bottom of the page and deactivate the javascript using the toggle

-
Repeat the same process for the CSS tab
-
Next, click PUBLISH
 at the top of the page to reflect the changes in the store
 -
Test the checkout process in the store
-
Other VTEX Service Availability Errors
- Service Status: Check the VTEX status page for any ongoing issues or maintenance that may be affecting the payment processing in their Statuspage VTEX Status. For instructions on how to check the status of VTEX services, refer to the VTEX Help Center Documentation.
Adyen Configuration Issues
Invalid API Key
Regenerate the API key in the Adyen admin panel and update it in VTEX. (See: API Key Configuration)
Payment Processing Errors
Check the Adyen troubleshooting guide for common issues and solutions.
Error 403
There are different scenarios that can generate a 403 error.
Scenario 1) Live URL set for test transactions
For test transactions don’t set the live url, otherwise you may face an error 403. The live url should be set only for production transactions. (See: Live URL)
Scenario 2) Wrong Merchant name
Make sure the Merchant Account filled in VTEX is the exact same as seen in your Adyen Customer Area. It is important to follow even the capital letters, spaces and other special characters (See: Getting Credentials)
Scenario 3) Ticket to Adyen Support was not opened yet or the enablement done was not to the correct username
Make sure you open the ticket to the Adyen support following the instruction we provided in step xx and that you inform the correct username. Remember that if for some reason new credentials are created, the permission needs to be granted by the Adyen team again. (See: PCI Role))))))e))